Brake Rotors and Pads
I decided to wait a couple of days after I did the brake lines, fluid and speedbleeders before replacing the mechanical parts of the braking system - pads and rotors - in order for any leaks to show up. I was glad to see that there were no fluid leaks or other issues as I revisited each wheel for the next round of parts.Both the front and rear rotors had a distinct lip on the edge showing how much the rotor surface had worn down over the last 55,000 miles. I decided to replace the rotors with original-equipment parts, and upgrade the pads to Hawk HPS (high-performance street compound).
This article isn't going to be a complete step-by-step "HowTo" for brake replacement, because there are already several good sets of instructions. The best one is this posting by 'Meat' on the GolfMkV Forums. His photos and descriptions are top-notch, so instead of repeating it all I'll just offer some comments where my experience differed from the instructions:
- I only used the grease packets included with the Hawk pads
- Rear brakes, step 2 - scroll down this page to see the thin 15mm wrench I used to hold the caliper guide bolts.
- Rear brakes, step 4 - I could not fit the ratchet handle with the 14mm triple-square bit to the side on the A3 as shown in his photos. I had to have the ratchet handle pointing straight down. If the car is on a lift, this would be much easier.
- Front brakes, step 2 - I used a 7mm hex bit on a ratchet handle. I don't see how an allen wrench/hex key would have worked for me.
The the right inner front pad also has a wire for the wear sensor, which is not used on our cars (only the left side). You can cut that wire off when you install that pad. Once I got everything installed, I followed the bedding-in procedures on the Hawk packaging.
Front:
I ordered all the rotors from World Impex, which is the cheapest place to get genuine Audi/VW parts.


The pads came from TireRack, which is also where I got the Goodridge stainless-steel lines.


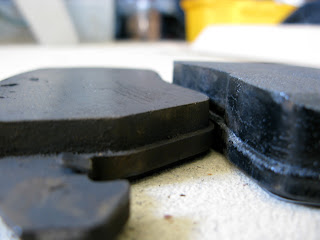
Front (outer) pad, the old worn one is on the left, the new Hawk HPS pad is on the right.

Same front pads, showing 55,000 miles of wear on the left, new on the right.


New rotor installed, new pads installed...

The caliper completely reassembled....

Ready to put the wheel back on! (Right Front)

Rear:
The rear rotors are solid, not vented like the fronts.


Unlike the front pads which are different inner/outer on each side, all four rear pads are identical (inner/outer, left/right).


The instructions I found before starting the job said that a thin 15mm wrench/spanner would be needed to remove the rear caliper guide bolts. I picked this one up from a bike shop, and it worked perfectly. It was a good thing that I did, since the other 15mm one that I already had was too thick to fit where it needed to go.

Rear pads, with the worn original one on the right and the new Hawk HPS pad on the left. The Hawk pads have a vent groove that was not present on the originals. Incidentally, the original pads were all made by Ferrodo.

New rear pad on the left, worn original on the right...


All installed and ready for the wheel to go back on! (Right Rear)


Conclusion:
Fresh rotors, the new brake lines, and the Hawk HPS pads are an excellent combination. It is a really, really significant improvement over both the worn stock setup and over how it felt when brand new. Less brake dust, no noise, and excellent stopping power. From 45 MPH on dry pavement, if I brake hard, ABS will kick in to prevent lockup. The pedal is firm and the whole system is now very confidence-inspiring. I highly recommend this combination to anyone looking for replacements (or an upgrade without going to a big-brake kit).
Thanks to Brandon D. for letting me borrow the 14mm triple-square bit!
Labels: Brakes, HowTo, Maintenance, Upgrades