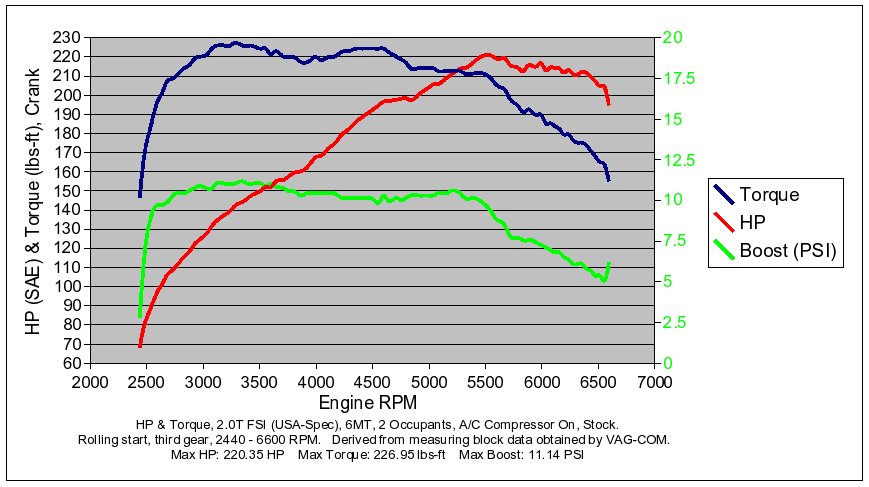
Data Logs - Stock Baseline
In technical discussions about the 2.0T FSI engine in various online forums, a few topics have been hotly discussed recently. These include the effects of software upgrades (from various vendors) on:
- Ignition timing & correction factors
- Air/Fuel ratio (AFR) - mixtures that may be much leaner than original
- Exhaust gas temperature (EGT) and the effects of high EGT on the turbo due to lean AFRs
- Requested boost vs. actual boost (may reflect boost leaks from a failed diverter valve or crankcase breather valve)
...and of course with
any power-related mod, what's the measurable gain?
Since I have not yet done
any powertrain mods and the engine is well-broken-in with 20,425 miles, I decided that now would be a good time to take some baseline measurements that I can use to evaluate future mods. I met up with Jim who had been taking the same measurements on his own A3 (which has a software upgrade), and we used his
VAG-COM to do the same logging on mine as a comparison.
The conditions were: Fairly flat, straight, dry road. Full-throttle from about 2000 - 2200 RPM in 3rd gear until redline. A/C compressor off. Almost full tank of fuel, 93-E10, same type and grade as I've been using. 2 occupants. Temperature 7C (~45F), ambient pressure 1019.5 mbar. Two runs were conducted in opposite directions.
Click below for the gallery of graphs from both runs, plus a graph of the power measurement run we did earlier in the year:
As I do powertrain mods, I can repeat the same runs and compare the results to this baseline.
Labels: VAG-COM
VAG-COM Coding Reference
NOTE: PLEASE READ THIS UPDATE FIRST
November 2011: UPDATE. I received this from another A3 owner and am adding it as a caution when using newer versions of VAG-COM
"I've got some information to add. It's actually kind of important, as it pertains to VAG-COM.
I met up with a guy who has a VAG-COM cable to do a code clear and also customize some programming using one of your procedures. I followed the instructions for "Enable Auto Window/Roof From Remote". The latest VAG-COM software has changed a bit, and it's more user friendly. In the Central-Conv section, Byte 03 and 04 don't have any labels but 05 does, with a number of checkboxes to set the desired behavior. I went ahead and put in the hex updates to 03 and 04, then the 05 setting. It worked. However, I discovered later that the fuel door switch was somehow disabled! There was no way I could get the door to open. Thankfully I was able to get back to the guy and refresh my system back to the original code. Then, I updated Byte 05 only this time. It worked--the fuel door was active again and the windows responded to the fob controls--disaster averted.
Anyway, I was really lucky in that I hadn't refueled prior to the VAG-COM change. I could have easily ended up several days later going to get fuel and dumbfounded by the fuel door not opening... and possibly having to bust it open. It might be worthwhile to just add a warning message to the blog that the steps outlined for programming VAG-COM are on an earlier release, and that in some cases they may not work properly with the latest release."
In addition to my
long coding worksheet for the Comfort Module and Central Electronics Module, there are several other things that can be easily modified using VAG-COM (or
similar product, but the instructions here are specific to VAG-COM). Here is a guide to walk you through the settings step-by-step. Some of these are more commonly known than others, and as I come up with more items I'll update this list:
You will need a
VAG-COM CANBUS-compatible cable, and a controlling computer capable of running Windows (either
natively or
virtually).
The 'Initial Steps' preceed any of the other items in the list.
-----------
Initial Steps:
- Plug the VAG-COM device into the vehicle
- Turn ignition key to 'ON' (do not start engine)
- Start up the VAG-COM software
- Click on 'Autoscan'. This will take you to another screen.
- Click on 'Gateway installation list'. This will scan your vehicle to determine what 'gateways' are available and whether they have any Diagnostic Trouble Codes. Any items listed in red after the scan have trouble codes. Make note of what the codes are for each red item, and return to the Gateway Installation List screen. If there are no red items (items with DTCs), then don't worry, just proceed on with your coding.
- Click on 'Clear all DTCs' and follow the prompts.
- Proceed on with desired item below....
---
Modify/Disable Seat-Belt Chime:Follow 'Initial Steps', above, then...
- Click on '17-Instruments'
- When you go into this module, it will scan for fault codes and go straight to a fault code screen. It should say 'No Fault Codes Found'. Click the 'Done, go back' button to get to the main screen for this module.
- Click 'Recode - 07'
- Make note of your original coding.
- Hover over the code with the mouse pointer, and it will show a pop-up balloon with information about the various digits of the code.
- One of the digits (2nd, counting right-to-left) is for the seat-belt chime configuration. It's originally set at '6' (USA). Changing it to '0' disables it entirely. For example, change 0002463 to 0002403
- Change this value in 'Software Coding___'
- Click 'Do It!'
- Click 'Close Controller, Go Back'
---
Recode Instruments from US to UK Configuration:Follow 'Initial Steps', above, then...
- Click on '17-Instruments'
- When you go into this module, it will scan for fault codes and go straight to a fault code screen. It should say 'No Fault Codes Found'. Click the 'Done, go back' button to get to the main screen for this module.
- Click 'Recode - 07'
- Make note of your original coding.
- Hover over the code with the mouse pointer, and it will show a pop-up balloon with information about the various digits of the code.
- One of the digits (3rd, counting right-to-left) is for the country configuration (for the instrument cluster only, it doesn't affect any other settings in Comfort/Central Electronics/any other module). It's originally set at '2' (USA). You will change it to '4' (UK/Britain). For example, change 0004203 to 0004403.
- Change this value in 'Software Coding___'
- Click 'Do It!'
- Click 'Close Controller, Go Back'
Note: By doing this, you have now...
- Still kept your odometer in miles (the other countries would be in km)
- Enabled the Euro-spec single-side parking light feature (flip the turn signal switch to one side or the other when you leave your car parked on a dark street, to mark it's position for safety)
- Changed your temperature readings to C (we'll change it back in a minute, see below)
- Disabled the 'Door Open' chime
- Changed the DRL behaviour (if you have bi-xenons) to only be active with the light switch Off, not with Parking lights
- Changed the trip computer (if present) to imperial gallons, 24-hour time, and day/month/year calendar display (we'll change it back in a minute, see below)
You'll need to correct the imperial gallons display BACK TO US GALLONS by simply following the instructions on pages 52-54 of the owner's manual to set the trip computer units (if you have a trip computer). If you don't change this setting, your MPG calculation will be WAY OFF. If you don't have a trip computer, never mind. If you live in Canada, then you may continue using imperial gallons or set it for Litres/100km, whichever is appropriate for you. If you're in the rest of the world, you probably don't need to mess with this coding change at all.
If you export an A3 from the US to Europe or elsewhere, use the 'Germany' or 'Rest of World' settings to get your odometer/etc. set appropriately.
To get your temperature back to F instead of C, press and hold the 'recirc' button and, while holding it, hold the driver's temp control to '+' until the display changes from C to F
One unavoidable consequence of this setting for left-hand-drive cars (like in the US) is that if you have the trip computer or information display in the instrument cluster, the 'Door Open' symbol will be reversed (e.g. drivers door open will be depicted on the right, and vice-versa). There is no way around this, sorry.
---
Recode Instrument Lighting to be 'Always On':Follow 'Initial Steps', above, then...
- Click on '17-Instruments'
- When you go into this module, it will scan for fault codes and go straight to a fault code screen. It should say 'No Fault Codes Found'. Click the 'Done, go back' button to get to the main screen for this module.
- Click 'Recode - 07'
- Make note of your original coding.
- Hover over the code with the mouse pointer, and it will show a pop-up balloon with information about the various digits of the code. It may or may not explain the rightmost digit.
- One of the digits (the one fartherest to the right) is for the instrument cluster backlighting configuration. It's originally set at '3' (for the US models). You will change it to '4' (Pointers and scales ON, with Dimming Feature). For example, change 0004203 to 0004204.
- Change this value in 'Software Coding___'
- Click 'Do It!'
- Click 'Close Controller, Go Back'
Note: By doing this, you have now set both the pointers and number scales in the instrument cluster to be on at all times rather than being sensitive to ambient light with the photosensor. The reason for the factory setting is to provide a visual cue that you need to turn on your headlights. Having the instruments lit all the time defeats this. Do this mod at your own risk. FYI - the photosensor is the almost invisible circle on the speedometer face right at the high end of the scale.
---
Enable Digital Speedometer Function in Concert II Head Unit:Follow 'Initial Steps', above, then...
- Click on '56-Radio'
- When you go into this module, it will scan for fault codes and go straight to a fault code screen. It should say 'No Fault Codes Found'. Click the 'Done, go back' button to get to the main screen for this module.
- Click on 'Recode - 07'
- Make note of your original coding.
- Hover over the code with the mouse pointer, and it will show a pop-up balloon with information about the various digits of the code.
- Most US models are coded 0001005. Add 400000 to the original coding. For example, this would change it to 0401005
- Change this value in 'Software Coding _______'
- Click 'Do It!'
- Click 'Close Controller, Go Back'
To use this feature, turn off the radio, and hold 'Menu' while turning it back on. To get the normal display back, turn the radio off and back on. It's only in kilometres, not miles.
---
Modify Steering Boost Setting: Note: This does not work on 2007 models. These instructions will be updated once somebody figures it out.Follow 'Initial Steps', above, then...
- Click on '44-Steering assist'
- When you go into this module, it will scan for fault codes and go straight to a fault code screen. It should say 'No Fault Codes Found'. Click the 'Done, go back' button to get to the main screen for this module.
- Click on 'Adaptation - 10'
- Click on the 'Channel Number' "Up" Icon until it shows Channel 1
- Click the 'Up' or 'Dn' buttons to get to a new value, don't just type it in. People report liking '0' (least boost) through '3' as new settings, I personally prefer '2'.
- Click 'Save'
- It may ask "Are you sure", click "Yes"
- You may want to check again to make sure your new setting is showing up in the 'Stored Value' field, just to be sure.
- Click 'Done, go back'
- Click 'Close controller, Go Back'
---
Enable Rear Fog Lights:Follow 'Initial Steps', above, then...
- Click on '09-Central Elect'
- When you go into this module, it will scan for fault codes and go straight to a fault code screen. It should say 'No Fault Codes Found'. Click the 'Done, go back' button to get to the main screen for this module.
- Click on 'Long Coding - 07'
- You may get a pop-up warning, click 'yes' for long coding
- WRITE DOWN your original long code before doing anything else at all.
- Click on 'Long Coding Helper'
- In the Long Coding Helper, set:
- Byte 03 bit 01 to '0' for both rear fogs, or '1' for 1 rear fog
- Byte 04 bit 04 to '1'
- Byte 04 bit 06 to '0'
- Click 'Transfer Coding'
- Quit out of the Long Coding Helper
- See that the new Long Code differs from the original one
- Click 'Do it!'
- Verify that the new Long Code is stored.
- Click 'Done, go back'
- Click 'Close controller, Go Back'
Note: You still need the appropriate headlamp switch to make this work.
---
Enable Front Turn Signals (in the lamp assembly) To Also Be Front Parking Lights:Follow 'Initial Steps', above, then...
- Click on '09-Central Elect'
- When you go into this module, it will scan for fault codes and go straight to a fault code screen. It should say 'No Fault Codes Found'. Click the 'Done, go back' button to get to the main screen for this module.
- Click on 'Long Coding - 07'
- You may get a pop-up warning, click 'yes' for long coding
- WRITE DOWN your original long code before doing anything else at all.
- Click on 'Long Coding Helper'
- In the Long Coding Helper, set:
- Byte 07 to '5C'
(Just set the value given for the whole byte, you don't have to flip every bit individually within the byte)
- Click 'Transfer Coding'
- Quit out of the Long Coding Helper
- See that the new Long Code differs from the original one
- Click 'Do it!'
- Verify that the new Long Code is stored.
- Click 'Done, go back'
- Click 'Close controller, Go Back'
This is useful if you have modified/removed the sidemarkers. If you have bi-xenon lamps, I recommend wiring up the city lights instead.
---
Enable Daytime Running Lights (DRL) (on cars not equipped with bi-xenon headlamps):Follow 'Initial Steps', above, then...
- Click on '09-Central Elect'
- When you go into this module, it will scan for fault codes and go straight to a fault code screen. It should say 'No Fault Codes Found'. Click the 'Done, go back' button to get to the main screen for this module.
- Click on 'Long Coding - 07'
- You may get a pop-up warning, click 'yes' for long coding
- WRITE DOWN your original long code before doing anything else at all.
- Click on 'Long Coding Helper'
- In the Long Coding Helper, set:
- Byte 00 bit 04 to '1' for North American style DRLs
- OR -
- Byte 00 bit 03 to '1' for Scandanavian style DRLs
(Do one or the other, do NOT try to set both Bytes active at the same time!)
- Click 'Transfer Coding'
- Quit out of the Long Coding Helper
- See that the new Long Code differs from the original one
- Click 'Do it!'
- Verify that the new Long Code is stored.
- Click 'Done, go back'
- Click 'Close controller, Go Back'
I really dislike DRLs. They're annoying and do not contribute to safety at all in my opinion, but if you want them on your car this is how to do it.
---
Enable Auto Window/Roof From Remote:Follow 'Initial Steps', above, then...
- Click on '46-Central Conv.'
- When you go into this module, it will scan for fault codes and go straight to a fault code screen. It should say 'No Fault Codes Found'. Click the 'Done, go back' button to get to the main screen for this module.
- Click on 'Long Coding - 07'
- WRITE DOWN your original long code before doing anything else at all.
- Click on 'Long Coding Helper'
- In the Long Coding Helper, set:
- Byte 03 to '40'
- Byte 04 to '3F'
- Byte 05 to '3F'
(Just set the value given for the whole byte, you don't have to flip every bit individually within those bytes)
- Click 'Transfer Coding'
- Quit out of the Long Coding Helper
- See that the new Long Code differs from the original one
- Click 'Do it!'
- Verify that the new Long Code is stored.
- Click 'Done, go back'
- Click 'Close controller, Go Back'
Test to verify that it works correctly: Open all windows and the sunroof (if present). Lock the car with the remote, and continue holding down the 'Lock' button - once the windows and roof start to move, release the button and they'll continue closing (the 'Auto' feature). Pressing the remote again while they're closing stops them. To open, press the 'Unlock' button and hold it while the windows open. There is no 'Auto' function for opening, and there is no way to open the sunroof from the remote.
---
Enable or Disable 'Selective (Un)Locking' From Remote:'Selective Locking' means that you press the 'unlock' button on your remote once to unlock the driver's door, and twice to unlock all doors. Most 2006 models were shipped with selective locking disabled, meaning that one press of the remote unlocks all doors. 2007 models are being shipped with it enabled. Either way, if you want to change how yours behaves you can do the following: Follow 'Initial Steps', above, then...
- Click on '46- Central Conv.'
- When you go into this module, it will scan for fault codes and go straight to a fault code screen. It should say 'No Fault Codes Found'. Click the 'Done, go back' button to get to the main screen for this module.
- Click on 'Long Coding - 07'
- WRITE DOWN your original long code before doing anything else at all.
- Click on 'Long Coding Helper'
- In the Long Coding Helper, set:
- Byte 00 bit 0 to '1' to ENABLE selective locking
-OR-
- Byte 00 bit 0 to '0' to DISABLE selective locking
- Click 'Transfer Coding'
- Quit out of the Long Coding Helper
- See that the new Long Code differs from the original one
- Click 'Do it!'
- Verify that the new Long Code is stored.
- Click 'Done, go back'
- Click 'Close controller, Go Back'
Test to verify that it works correctly: Exit the car and lock it with the remote. Press the 'unlock' button on the remote ONCE. If only the driver's door unlocks and the rest remain locked, selective locking is ENABLED on your car. Pressing the 'unlock' button on the remote twice in a row should unlock all doors. If pressing the 'unlock' button on the remote just once unlocks all doors at the same time, selective locking is DISABLED on your car.
--------------
Please use the link at the top right of this page to email me with any corrections, additions or suggestions.
Updated 01 September 2006 with instrument lighting info, and the tip about the door open pictogram being reversed with the UK instrument coding.
Updated 26 September 2006 with note about 2007 steering boost, and added the front parking lights instructions.
Updated 15 November 2006 with DRL activation instructions.
Updated 08 February 2007 with Selective Locking instructions.
Updated November 2011 with the note at the top of the page.
Links fixed December 2015.Labels: HowTo, VAG-COM
A3 CAN System Long Coding Worksheet & Instructions (for use with VAG-COM)
Read the background information on this page. For a lot of common items, you may not need the spreadsheet linked below. Instead, see my VAG-COM Coding Reference. The files linked below are useful for a 'big picture' of what's going on with the Central Electronics and Comfort System coding, or for a few settings which aren't covered in my other instructions.
NOTE: The software formerly known as VAG-COM is now called VCDS, still made by Ross-Tech.com. All references to VAG-COM now apply to VCDS.
NOTE: PLEASE READ THIS UPDATE FIRST
November 2011: UPDATE. I received this from another A3 owner and am adding it as a caution when using newer versions of VAG-COM
"I've got some information to add. It's actually kind of important, as it pertains to VAG-COM.
I met up with a guy who has a VAG-COM cable to do a code clear and also customize some programming using one of your procedures. I followed the instructions for "Enable Auto Window/Roof From Remote". The latest VAG-COM software has changed a bit, and it's more user friendly. In the Central-Conv section, Byte 03 and 04 don't have any labels but 05 does, with a number of checkboxes to set the desired behavior. I went ahead and put in the hex updates to 03 and 04, then the 05 setting. It worked. However, I discovered later that the fuel door switch was somehow disabled! There was no way I could get the door to open. Thankfully I was able to get back to the guy and refresh my system back to the original code. Then, I updated Byte 05 only this time. It worked--the fuel door was active again and the windows responded to the fob controls--disaster averted.
Anyway, I was really lucky in that I hadn't refueled prior to the VAG-COM change. I could have easily ended up several days later going to get fuel and dumbfounded by the fuel door not opening... and possibly having to bust it open. It might be worthwhile to just add a warning message to the blog that the steps outlined for programming VAG-COM are on an earlier release, and that in some cases they may not work properly with the latest release."
The A3 is part of a new generation in automotive electronics, which brings a new ability to customise it easily.
In the past, any electrical accessory had to be wired from the battery, usually through a switch, to the device. It worked however it worked, and couldn't be easily reconfigured. This meant greater complexity and expense, and difficulty adapting cars for different markets. For example: with power windows, every window motor had to be wired through it's own switch and through the set of switches for the driver (if so equipped), making for a complex wiring harness. Headlights/taillights wired up for the European market couldn't be easily converted for the US market, and vice-versa.
With modern technology, everything is different. The A3 handles everything through a central computer system. Every switch and device is a node on the Controller Area Network (CAN) which runs throughout the car. This means that many features can be modified by altering the programming of the CAN system computer.
I won't go into a lot of detail about the wiring, but here's a comparison of old vs. new:
The old way: Turn parking light switch 'on', 12v current flows through switch to the parking light bulb(s), making it light up. Step on the brake pedal, switch closes allowing 12v current to flow to another filament or bulb, making the brake light come on. The brake light is brighter than the tail light because of the difference in bulb wattages.
The new way: Turn parking light switch 'on'. Computer gets the signal from the light switch, and applies reduced voltage to one or more bulbs on each side, making them glow at 24% of their maximum brightness, to act as tail lights. Which bulbs are activated, and the percentage of brightness, are dependent on the settings in the car's computer. When you step on the brake pedal, the computer gets a signal from the brake switch and increases the tail light voltage to make the bulbs glow at 100% of their maximum brightness to act as brake lights. Again, which bulbs are affected is dependent on the computer settings. Change the settings == change the behaviour, no re-wiring needed.
There are a lot of settings which are for compliance with regulations in different countries (e.g. lighting), and others which are simply marketing choices. What is great for us is that Audi has chosen to not lock this down, so that anyone who has the proper (hardware & software) tools can modify a lot of cool stuff.
About those tools..... There are three choices:
I'm not going into details of how to operate any of the tools here, or debate which is better. Instead, I'm going to make it easier to change some of the settings in the A3 computer by providing a spreadsheet and some notes.
All of the settings information I originally obtained from
en.openobd.org and
de.openobd.org, and refined through experimentation. I thank the guys who run that site for their work, and encourage you to check it out as an additional resource. For the specific A3 long coding settings, I think my presentation is more usable and some of my descriptions are more easily understood than the German translations that you'll find elsewhere.
Some of the settings that are possible on the A3 are made through 'adaptation', which is basically using something like VAG-COM (VCDS) to pick various choices out of a menu. Other settings, though, are done through 'long coding' which involves setting of individual bits & bytes in the programming. I have made what I think is the best, safest, most understandable and efficient method of editing the long codings for the Central Electronics module and the Comfort System module. This is how you can enable one or both rear fog lights (if you have the correct light switch, not a standard USA-market one), enable auto-closing of windows and sunroof (and auto-opening of the windows) from the remote, change tail light & front fog light configurations, etc.
My solution is developed in a spreadsheet. It contains multiple worksheets with an explanation of 'long coding', instructions on how to use the spreadsheet, and worksheets for the Central Electronics and Comfort modules on the 2006 A3. The spreadsheet was developed in
OpenOffice LibreOffice Calc, which is the spreadsheet application of a Free (in every sense) office software suite for Windows/Linux/MacOS. Links to download it are provided below. I'm also providing instructions on how to set some preferences in
OpenOffice LibreOffice to make it work best for you. The spreadsheet file is named with the version number. With it open in
OpenOffice LibreOffice Calc, you can also do
File --> Document Properties... to get version information.
You CAN redistribute this, as long as the copyright notices are intact. If you redistribute a modified version, you must include my original along with it (consider it the 'source code').
I do not support converting it to Excel or any other proprietary format. If you do so on your own, make sure you (a) take responsibility for supporting that yourself if you redistribute it, and (b) attribute and include my original along with it.
Downloads:
If you are only interested in looking at some information, then here are some PDFs generated from the spreadsheet. Note that the long codes have been zeroed out, so DO NOT attempt to 'use' the PDFs to figure out your long coding solutions! Use the spreadsheet instead! These are just for reading material...
EDIT AUGUST 2025: The download links for these files are now fixed, but I don't expect that anyone actually cares.
Please email me with any feedback or questions, using the "Email me" link in the upper left of this page. This article will be revised/updated as necessary, and revisions may not be noted. Please consider referring other people to this article to download the items rather than passing them on yourself, since I may have updated something since you downloaded your copy.Enjoy!
Labels: HowTo, VAG-COM
Power Measurement - First Try
Last night Ryan, Jim and I did some measurements using VAG-COM to read the various sensors and derive horsepower & torque. I didn't have a perfect run, so I'll do this better another time, but here is the result of the first test. Next time I'll turn off the HVAC compressor, not have a passenger on board, and start from 1500 RPM like I should have.
Until then, these results are pretty good:

Labels: VAG-COM