It's Gone
From: Saturday, 22 October 2005
To: Monday, 21 February 2011
- 1949 days
- 5 years, 4 months
- 168,393,600 seconds
- 2,806,560 minutes
- 46,776 hours
- 278 weeks
It had to go. Partially because of the ever-increasing deferred maintenance that I knew I had to do and pay for soon, partially because I was burnt out on it.
It's gone. I will miss some things about it. Actually, many things about it. Maybe someday I'll find another car to get excited about.
(Look farther down this post for an update 2.5 years later...)


Here are the final stats for every single fueling
(click to enlarge):
When I was about to drive off in my new car, I couldn't. I got out and went over to the A3. Walked around it, caressed it. I got in. Flashed the bi-xenon lamps. Foot on the modified Ultimate Pedals clutch, I shifted through all the gears remembering the night I installed the Forge Short Shift Kit. As I glanced up, I saw the lady sales manager was watching me out the dealership window, smiling. I got out of the A3, into my new car, and drove away.
Even dysfunctional relationships are hard to leave behind.
Thank you for all the visits to this blog, and for all the emails over the years. I'll leave it up as a resource for the A3 community as long as people are still reading it.
Tschüss,
Len
____________________________________________
UPDATE: August 2013
I replaced the A3 as described above in February 2011 with a Subaru. Perfectly reliable and it met my needs at that time, but it definitely was not "me". I got rid of it in August 2013, and replaced it with...
...a 2013 Volt. It makes me happy. The next step will be something 100% battery-electric.
Labels: Photos
Brake Rotors and Pads
I decided to wait a couple of days after I did the
brake lines, fluid and speedbleeders before replacing the mechanical parts of the braking system - pads and rotors - in order for any leaks to show up. I was glad to see that there were no fluid leaks or other issues as I revisited each wheel for the next round of parts.
Both the front and rear rotors had a distinct lip on the edge showing how much the rotor surface had worn down over the last 55,000 miles. I decided to replace the rotors with original-equipment parts, and upgrade the pads to Hawk HPS (high-performance street compound).
This article isn't going to be a complete step-by-step "HowTo" for brake replacement, because there are already several good sets of instructions.
The best one is this posting by 'Meat' on the GolfMkV Forums. His photos and descriptions are top-notch, so instead of repeating it all I'll just offer some comments where my experience differed from the instructions:
- I only used the grease packets included with the Hawk pads
- Rear brakes, step 2 - scroll down this page to see the thin 15mm wrench I used to hold the caliper guide bolts.
- Rear brakes, step 4 - I could not fit the ratchet handle with the 14mm triple-square bit to the side on the A3 as shown in his photos. I had to have the ratchet handle pointing straight down. If the car is on a lift, this would be much easier.
- Front brakes, step 2 - I used a 7mm hex bit on a ratchet handle. I don't see how an allen wrench/hex key would have worked for me.
The the right inner front pad also has a wire for the wear sensor, which is not used on our cars (only the left side). You can cut that wire off when you install that pad. Once I got everything installed, I followed the bedding-in procedures on the Hawk packaging.
Front: I ordered all the rotors from
World Impex, which is the cheapest place to get genuine Audi/VW parts.


The pads came from
TireRack, which is also where I got the Goodridge stainless-steel lines.


Front (outer) pad, the old worn one is on the left, the new Hawk HPS pad is on the right.

Same front pads, showing 55,000 miles of wear on the left, new on the right.

New rotor installed, new pads installed...

The caliper completely reassembled....

Ready to put the wheel back on! (Right Front)

Rear: The rear rotors are solid, not vented like the fronts.


Unlike the front pads which are different inner/outer on each side, all four rear pads are identical (inner/outer, left/right).


The instructions I found before starting the job said that a thin 15mm wrench/spanner would be needed to remove the rear caliper guide bolts. I picked this one up from a bike shop, and it worked perfectly. It was a good thing that I did, since the other 15mm one that I already had was too thick to fit where it needed to go.

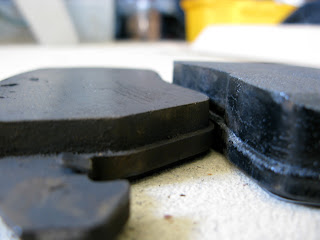
Rear pads, with the worn original one on the right and the new Hawk HPS pad on the left. The Hawk pads have a vent groove that was not present on the originals. Incidentally, the original pads were all made by Ferrodo.

New rear pad on the left, worn original on the right...


All installed and ready for the wheel to go back on! (Right Rear)

 Conclusion:
Fresh rotors, the new brake lines, and the Hawk HPS pads are an excellent combination. It is a really, really significant improvement over both the worn stock setup and over how it felt when brand new. Less brake dust, no noise, and excellent stopping power. From 45 MPH on dry pavement, if I brake hard, ABS will kick in to prevent lockup. The pedal is firm and the whole system is now very confidence-inspiring. I highly recommend this combination to anyone looking for replacements (or an upgrade without going to a big-brake kit).
Thanks to Brandon D. for letting me borrow the 14mm triple-square bit!
Labels: Brakes, HowTo, Maintenance, Upgrades
Brake Lines and SpeedBleeders
Several months ago I purchased all the necessary parts for brake maintenance and mild upgrade, but for several reasons (mostly cold weather, and lack of a necessary tool) I've been putting off getting them installed. I decided that 55,000 miles was a good time to get the project moving, so I broke it down into two parts. The first part is the replacement of the 4 original flex lines with braided stainless-steel lines, replacement of the bleeder nipples on the calipers with 'SpeedBleeders', and flushing the system with new fluid, as described here. The second part is
replacing the pads and rotors, described in a separate article.
Brake systems work on hydraulic pressure. The lines that carry the fluid from the master cylinder up front to each of the wheels are rigid metal for most of their length. However, they have to have
some flexible part at each wheel to account for up-and-down suspension movement and steering. These flexible segments are typically made of reinforced rubber. With most stock rubber lines, some 'ballooning' of the line occurs when you press the pedal, which reduces the force transmitted to the brakes. If you had flexible lines that would resist 'ballooning', more of the pedal force will be transmitted to the brakes. This is usually accomplished by installing brake lines that have a braided stainless-steel jacket that prevents ballooning. The best quality (and DOT/TuV-approved) lines have a plastic or kevlar coating over the stainless-steel braid to protect the braid against chafing.
I have installed braided stainless-steel lines on several cars. On some cars they had a very noticeable effect, on others (including the A3) the stock lines are pretty strong to begin with, so the improvement is smaller, but still worth it.
The brake line kit I chose was the Goodridge part number 30007. It comes with 2 front lines, 2 rear lines, and new banjo-bolts and washers for the front lines.


Any time you loosen a brake line you introduce air into the system which will need to be bled out. Bleeding is usually a 2-person job - one person to pump & hold the pedal while the other one opens and closes the bleeder on the caliper. Since there is only one of me, I needed a way to bleed the brakes solo. I decided to replace the bleeder nipples with SpeedBleeders, which have an internal checkvalve. You can open one a couple of turns, then go pump the pedal to force air and fluid out of that line/caliper without worrying about sucking any air back in. When tightened down they seal just like the standard ones.
The thread size needed for the A3 (and VW Mk5 GTI/GLI/Jetta/Rabbit) is M10 x 1.0. While you can order them online direct from the manufacturer, they are also available cheaper at PepBoys auto parts under the 'HELP!' brand name, item number 12706. You'll need 2 packs, for a total of 4 bleeder nipples (1 per caliper).

And of course you'll need appropriate brake fluid.

Installing the new Goodridge stainless-steel brake lines was not too difficult, only tedious. I did one wheel at a time. After removing the wheel, the first thing I did was to replace the bleeder nipple with a SpeedBleeder. Then I removed the (two on the front / one on the rear) spring clip(s) securing the flex line, and unbolted one end at a time making sure to catch all brake fluid in an appropriate container. When installing the new lines, you have to be careful not to twist them. They have a dashed marking caled a 'torque line' that helps you visually see that you haven't twisted the line as you position it.
The front line uses a banjo-bolt to attach to the caliper. New bolts and copper washers (1 inner and 1 outer washer per banjo bolt) are provided - do not reuse the originals.
Once the new line was installed, I bled the air out of that caliper and pumped quite a bit of fluid through to completely flush that circuit before moving on to the next wheel.
New front brake line:


SpeedBleeder and banjo-bolt on the front caliper:

Front midpoint clip (shorter rear lines do not have this):

Front attachment of flex line to hard line:

Shorter rear lines:


The ends of the flex lines are made to fit into the brackets on the rear to secure the line and prevent it from twisting. The lines were not a compatible shape with the brackets on the car - I've contacted Goodridge to see if this was just an oversight on the kit that I got. I solved it by using a Dremel with a high-speed cutting wheel to cut notches in the rear brackets to accommodate the new lines.
Labels: Brakes, HowTo, Maintenance, Upgrades
© 2005, 2024, Some rights reserved. You may use information here on your own site only if you attribute it and link back to the source. This is a personal site, NOT AFFILIATED WITH Audi, Volkswagen, their parent companies, or any other media interest.


