Brake Rotors and Pads
I decided to wait a couple of days after I did the
brake lines, fluid and speedbleeders before replacing the mechanical parts of the braking system - pads and rotors - in order for any leaks to show up. I was glad to see that there were no fluid leaks or other issues as I revisited each wheel for the next round of parts.
Both the front and rear rotors had a distinct lip on the edge showing how much the rotor surface had worn down over the last 55,000 miles. I decided to replace the rotors with original-equipment parts, and upgrade the pads to Hawk HPS (high-performance street compound).
This article isn't going to be a complete step-by-step "HowTo" for brake replacement, because there are already several good sets of instructions.
The best one is this posting by 'Meat' on the GolfMkV Forums. His photos and descriptions are top-notch, so instead of repeating it all I'll just offer some comments where my experience differed from the instructions:
- I only used the grease packets included with the Hawk pads
- Rear brakes, step 2 - scroll down this page to see the thin 15mm wrench I used to hold the caliper guide bolts.
- Rear brakes, step 4 - I could not fit the ratchet handle with the 14mm triple-square bit to the side on the A3 as shown in his photos. I had to have the ratchet handle pointing straight down. If the car is on a lift, this would be much easier.
- Front brakes, step 2 - I used a 7mm hex bit on a ratchet handle. I don't see how an allen wrench/hex key would have worked for me.
The the right inner front pad also has a wire for the wear sensor, which is not used on our cars (only the left side). You can cut that wire off when you install that pad. Once I got everything installed, I followed the bedding-in procedures on the Hawk packaging.
Front: I ordered all the rotors from
World Impex, which is the cheapest place to get genuine Audi/VW parts.


The pads came from
TireRack, which is also where I got the Goodridge stainless-steel lines.


Front (outer) pad, the old worn one is on the left, the new Hawk HPS pad is on the right.

Same front pads, showing 55,000 miles of wear on the left, new on the right.

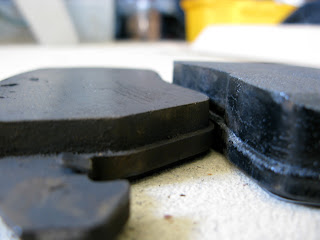
New rotor installed, new pads installed...

The caliper completely reassembled....

Ready to put the wheel back on! (Right Front)

Rear: The rear rotors are solid, not vented like the fronts.


Unlike the front pads which are different inner/outer on each side, all four rear pads are identical (inner/outer, left/right).


The instructions I found before starting the job said that a thin 15mm wrench/spanner would be needed to remove the rear caliper guide bolts. I picked this one up from a bike shop, and it worked perfectly. It was a good thing that I did, since the other 15mm one that I already had was too thick to fit where it needed to go.

Rear pads, with the worn original one on the right and the new Hawk HPS pad on the left. The Hawk pads have a vent groove that was not present on the originals. Incidentally, the original pads were all made by Ferrodo.

New rear pad on the left, worn original on the right...


All installed and ready for the wheel to go back on! (Right Rear)

 Conclusion:
Fresh rotors, the new brake lines, and the Hawk HPS pads are an excellent combination. It is a really, really significant improvement over both the worn stock setup and over how it felt when brand new. Less brake dust, no noise, and excellent stopping power. From 45 MPH on dry pavement, if I brake hard, ABS will kick in to prevent lockup. The pedal is firm and the whole system is now very confidence-inspiring. I highly recommend this combination to anyone looking for replacements (or an upgrade without going to a big-brake kit).
Thanks to Brandon D. for letting me borrow the 14mm triple-square bit!
Labels: Brakes, HowTo, Maintenance, Upgrades
Brake Lines and SpeedBleeders
Several months ago I purchased all the necessary parts for brake maintenance and mild upgrade, but for several reasons (mostly cold weather, and lack of a necessary tool) I've been putting off getting them installed. I decided that 55,000 miles was a good time to get the project moving, so I broke it down into two parts. The first part is the replacement of the 4 original flex lines with braided stainless-steel lines, replacement of the bleeder nipples on the calipers with 'SpeedBleeders', and flushing the system with new fluid, as described here. The second part is
replacing the pads and rotors, described in a separate article.
Brake systems work on hydraulic pressure. The lines that carry the fluid from the master cylinder up front to each of the wheels are rigid metal for most of their length. However, they have to have
some flexible part at each wheel to account for up-and-down suspension movement and steering. These flexible segments are typically made of reinforced rubber. With most stock rubber lines, some 'ballooning' of the line occurs when you press the pedal, which reduces the force transmitted to the brakes. If you had flexible lines that would resist 'ballooning', more of the pedal force will be transmitted to the brakes. This is usually accomplished by installing brake lines that have a braided stainless-steel jacket that prevents ballooning. The best quality (and DOT/TuV-approved) lines have a plastic or kevlar coating over the stainless-steel braid to protect the braid against chafing.
I have installed braided stainless-steel lines on several cars. On some cars they had a very noticeable effect, on others (including the A3) the stock lines are pretty strong to begin with, so the improvement is smaller, but still worth it.
The brake line kit I chose was the Goodridge part number 30007. It comes with 2 front lines, 2 rear lines, and new banjo-bolts and washers for the front lines.


Any time you loosen a brake line you introduce air into the system which will need to be bled out. Bleeding is usually a 2-person job - one person to pump & hold the pedal while the other one opens and closes the bleeder on the caliper. Since there is only one of me, I needed a way to bleed the brakes solo. I decided to replace the bleeder nipples with SpeedBleeders, which have an internal checkvalve. You can open one a couple of turns, then go pump the pedal to force air and fluid out of that line/caliper without worrying about sucking any air back in. When tightened down they seal just like the standard ones.
The thread size needed for the A3 (and VW Mk5 GTI/GLI/Jetta/Rabbit) is M10 x 1.0. While you can order them online direct from the manufacturer, they are also available cheaper at PepBoys auto parts under the 'HELP!' brand name, item number 12706. You'll need 2 packs, for a total of 4 bleeder nipples (1 per caliper).

And of course you'll need appropriate brake fluid.

Installing the new Goodridge stainless-steel brake lines was not too difficult, only tedious. I did one wheel at a time. After removing the wheel, the first thing I did was to replace the bleeder nipple with a SpeedBleeder. Then I removed the (two on the front / one on the rear) spring clip(s) securing the flex line, and unbolted one end at a time making sure to catch all brake fluid in an appropriate container. When installing the new lines, you have to be careful not to twist them. They have a dashed marking caled a 'torque line' that helps you visually see that you haven't twisted the line as you position it.
The front line uses a banjo-bolt to attach to the caliper. New bolts and copper washers (1 inner and 1 outer washer per banjo bolt) are provided - do not reuse the originals.
Once the new line was installed, I bled the air out of that caliper and pumped quite a bit of fluid through to completely flush that circuit before moving on to the next wheel.
New front brake line:


SpeedBleeder and banjo-bolt on the front caliper:

Front midpoint clip (shorter rear lines do not have this):

Front attachment of flex line to hard line:

Shorter rear lines:


The ends of the flex lines are made to fit into the brackets on the rear to secure the line and prevent it from twisting. The lines were not a compatible shape with the brackets on the car - I've contacted Goodridge to see if this was just an oversight on the kit that I got. I solved it by using a Dremel with a high-speed cutting wheel to cut notches in the rear brackets to accommodate the new lines.
Labels: Brakes, HowTo, Maintenance, Upgrades
Group 48 Battery
Last week was pretty cold. When I left work on Friday evening, I tried to start the car and it turned over once.... paused...... lights dim.... then turned over again and caught. I hoped the battery wasn't really dying, but I tried it Saturday morning after it sat overnight and the same thing happened, then again while I was out running errands. OK, time to replace the battery. This one had lasted 3 years and 50,000 miles, which is OK for an original battery. The one in my old GTI died completely after only 6 months. I replaced it with an Optima Red Top, which lasted the next 6 years.
Car batteries are referred to by their "group" number, which denotes the dimensions (length, width, height), terminal type, and terminal orientation (left/right).
Here is a table that shows the measurements for different battery groups.The battery that comes in the A3 from the factory is a Group 47 size. It has recessed terminal posts, and reversed terminals
(viewing the long side when the terminals are closest to you, positive is on the right and negative is on the left). It has a heat-insulating blanket around it that must be re-used.
If you want a little better performance, you can install a Group 48 battery. The only difference between the Group 47 and Group 48 is the length, and the larger one will just barely fit in the A3's battery box. The original battery is only 480CA/280CCA capacity.
I wanted to put in an Optima battery, but they don't specifically make a Group 47/48 style. (I later learned that an Optima 75/35 can be made to fit.) Batteries are sold under several brand names which are all made by Johnson Controls. "Interstate", "Duralast" and "BOSCH" are three of those brands.
I chose a BOSCH Group 48 battery that cost $90.00.

It has a 850CA/690CCA capacity, 36-month free replacement & 96-month pro-rated replacement warranty, and came with a roadside assistance card for free jumpstarts for the first 36 months.

Remove the top cover from the battery box. Completely remove the battery hold-down bolt/plate with a 13mm tool.

Remove the battery cables, loosening the connectors with a 10mm tool. ALWAYS LOOSEN & REMOVE THE NEGATIVE SIDE FIRST! Also, INSTALL and TIGHTEN the NEGATIVE side LAST! I have 3rd-degree burn scars from doing it wrong years ago.
When you pull out the old battery, the insulating blanket will come with it. Slide the blanket off the battery. If you're installing a Group 47 battery, you can just slide it onto the new one. If you're installing a Group 48 battery, you'll need to look for the tab where the blanket is attached to itself, and undo it. It will wrap around a Group 48 battery, but with no overlap, so it's a little harder to get it back into the battery box if you're doing this by yourself. It does fit, though.
Re-attach the cables (see note above) and the hold-down, making sure it's actually holding the battery down securely.


Labels: HowTo, Maintenance, Upgrades
Jack Pads
Here's a little enhancement that I've been meaning to do for a while. These inexpensive rubber pieces provide a good place to raise the car using a hydraulic floor jack, or a 4-point lift (like when having tires installed, for example).

Each pad is composed of two pieces. You position them together, then use a jack to press them into the correct points on the underside of the car. They lock together and lock into place on the car.


Back in 2005
"SwiftA4" posted instructions for doing this on the A3 Forum. The instructions and pictures are excellent, so I'm just going to link to them here. Part numbers are included. (If for some reason that thread on the forum becomes unavailable, I have a copy saved that I can post here.)
In addition to the 4 pad assemblies, I also got a special metal disk from ECS Tuning that fits into the pad when using a hydraulic floor jack. This gives a very stable lifting point. The disk has a bump on the top that fits into the bottom of the jack pad to keep it from sliding.


Labels: HowTo, Upgrades
Fumoto Oil Drain Valve
The 2006 A3s like mine came with 45,000 miles of 'free' maintenance, including oil changes. That meant dealer-provided changes at 5k, 15k, 25k, 35k and 45k miles since Audi's maintenance schedule calls for a 10,000-mile oil-change interval (OCI). I wanted to maintain a 5000-mile OCI on my car, so I did the intermediate ones at 10k, 20k, 30k and 40k myself. As of 50,000 miles, I'll be doing them all myself from now on. Oil changes on this engine are a real pain, mostly because of the filter. The drain plug is annoying like all drain plugs are, and there's a very easy way to solve that.
From the very beginning I wanted to do a
Fumoto valve but kept putting off ordering one. When I was going to do an oil change on my own I'd think about it, then decide to do it "next time". 10,000 miles later, I'd do the same thing....
Fumoto valves are great. They are well-made out of brass with a ball-valve mechanism, and they lock closed with a spring and a notch in the valve body. If you do your own oil changes I can only think of ONE reason not to use one, and that would be if your drain plug was vertical into the bottom of the oil pan, which would make the Fumoto valve stick down too low under the car. Fortunately, VW/Audi drain plugs are completely horizontal so there are no clearance issues at all.
The Fumoto valves come in two styles - one has a flat end where the oil drains, the other has a nipple where you could optionally stick a hose. I only use the latter style so I can make sure there is NO spillage of oil. Again, since the oil drain location is horizontal, there are no clearance issues with having the slightly longer valve.
If your oil pan has a protrusion (like on the 2.0T engine) or if the drain plug is completely recessed, you'll need to get one of their spacers to make the valve fit. A spacer is definitely needed on the 2.0T.
The valve with the correct threads (14mm - 1.5) and the nipple on the drain end is the F106N:

The adapter that is needed for it to fit is the ADP-106 (same threads as above, it just spaces it out from the oilpan):

The valve and the adapter as shipped, 2 separate pieces with soft crush washers:

A 19mm spanner fits the valve body for installation. Be careful to not overtighten! See the instructions on their website before installing. The spacer needs, I think, a 22mm tool. I forgot to note what size it was, but it's definitely larger than the 19mm that fits the valve:

Here are the valve and spacer assembled. The valve is closed. Note the valve lever is to the side, held into the locking notch by the spring:

To open the valve, you lift the lever out of the notch and rotate it forward:


Installation is trivial - Remove your drain plug to change your oil, let all of the oil drain, wipe the threads on the oil pan clean, and install the spacer & valve as if they were your drain plug. Finger-tighten, then 1/4-turn with the respective tools. You NEVER have to remove it, and it's completely painless to drop and replace the oil.

You can see the protruding part of the oil pan above the drain location that makes the spacer necessary.

Now if someone would just invent an oil-filter relocation kit so we can have the filter easily accessible from the top, instead of having to remove that plastic cover underneath every time....
Labels: HowTo, Maintenance, Upgrades
© 2005, 2025, Some rights reserved. You may use information here on your own site only if you attribute it and link back to the source. This is a personal site, NOT AFFILIATED WITH Audi, Volkswagen, their parent companies, or any other media interest.


