Cargo Cover Noise Fix
Whoever designed (or approved the design of) the 'shelf' cargo cover on the A3 really should have looked at the cover on the Mk. 4 Golf/GTI. The one on my old GTI made contact with the hatch when it was closed, so that the cover was held firmly in place and didn't move. On the A3, there's a gap between the cover and the hatch which allows the cover to move up slightly - not enough to have any actual purpose, just enough so that the cover will 'jump' and bang when you go over a speed bump, for example. Also, on the GTI the strings that let the hatch pull up the cover had nice little spring retractors that sucked the excess string in when the hatch was closed or the strings unhooked from the hatch; the A3 has two weights that pull the strings down where they dangle in the cargo area.
AND they bang around. This is really annoying lack of attention to detail in every way.
To solve the major problem, which is the cover 'jumping' and making noise when you drive over anything rough, I simply used velcro. Velcro has two parts, the 'hook' part and the 'loop' part. I got some peel-and-stick adhesive velcro and took care of it in two steps:
- Cut a 2" (5cm) square of the 'loop' velcro about and apply it in the correct position on the hatch.
- Cut another same-size square of the 'loop' velcro and of the 'hook' velcro, and stick the adhesive sides together back-to-back forming a pad with the 'hook' on one side and the 'loop' on the other. Stick this new pad onto the velcro square on the hatch, to make it thick enough to press against the cargo cover and hold it tightly in place.
 Self-adhesive Velcro 'loop' piece attached to the inside of the hatch. You can figure out exactly where to place it centered on where the cargo cover would strike it.
 Make the velcro pad with one 'hook' side....
 ...and one 'loop' side.
 Mate up the 'hook' side of the pad with the 'loop' material you stuck on the hatch previously.
Now there will be a soft contact point to press against the cargo cover and keep it from banging.Enjoy the silence.....
Labels: HowTo
Power Cables Into Armrest
I got tired of putting my phone in the cupholder, and having to mess with the power cable running under the armrest to one of the two power sockets there. There are two 12V power outlets
under the armrest console, and I wanted my phone
in the armrest console, so....
Flip up the armrest.
Locate the points on the left & right of the underside of the armrest as shown, and go 20 mm (3/4 inch) UP and 20 mm (3/4 inch) IN. it helps to make a template rather than using a ruler for this, so you can get exactly the right spots.
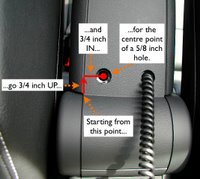
Take a 16 mm (5/8") wood bit, and set the centre point on the spot that you marked. Note that this will give you just enough clearance between the hole that the bit will make and the support of the console. Not only that, but there is stuff on the INSIDE of the armrest compartment that you need to miss, so get the measurements right!.
Drill the two holes. There is an inner and outer layer to the console, you have to go through both.
I got rubber grommets that fit into the hole and installed on the inside of the console (inner layer of plastic). This keeps the power cables from slipping, prevents chafing of the wire, and is just a nice finishing touch.
Pass the power cable (or iPod cable, or whatever you want) through the hole/grommet, and you're done.
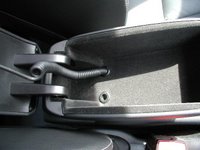
If you don't want the cable there sometimes, a piece of leather (
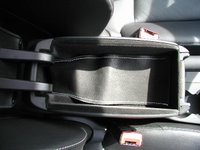
available at craft stores) makes a nice liner that covers the holes from the inside. Also, you can fold the piece of leather and it'll keep the phone from sliding down under the hinge of the armrest cover. I added the double-row white stitching with a sewing machine and some heavy white upholstery thread to mimic the look of the sport seats.
Piece of leather as a liner for the console:
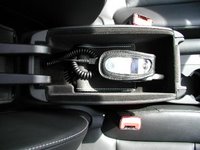
Phone plugged in:
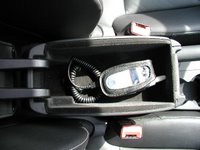
The same piece of leather keeping the phone from sliding:
When the armrest is down (mine is
never up), you don't see the holes.


Labels: Accessories, HowTo


