Wiper Features
The wipers on the A3 have a 'cleaning position' feature - when you turn off the ignition switch, tap the wiper stalk to 'wipe once' and the wipers will jump up midway on the windshield and stop there. That way you can fold them up for cleaning. However, I discovered yet another feature as part of this: When the wipers are in the cleaning position, you can 'wipe' them back-and-forth freely on the windshield! I expected they would be immovable like every other car, but you can actually move them to wherever you want. If you push them all the way down to the normal 'rest' position, though, they lock there
and they don't move when you restart the car, so no streaks on your just-cleaned windshield!
Another feature is that when you turn the car off, the wipers move slightly. Not a lot, just enough to 'flip' the blade edge to the other direction; so one time the wipers will move slightly down, and the next time slightly up, to keep the rubber blades 'exercised' to prolong life. It may look like only the right one is moving, but it's just that the right one is more visible than the left so you notice it more. You'll hear the sound of the wipers moving, but it's normal. Get used to it.
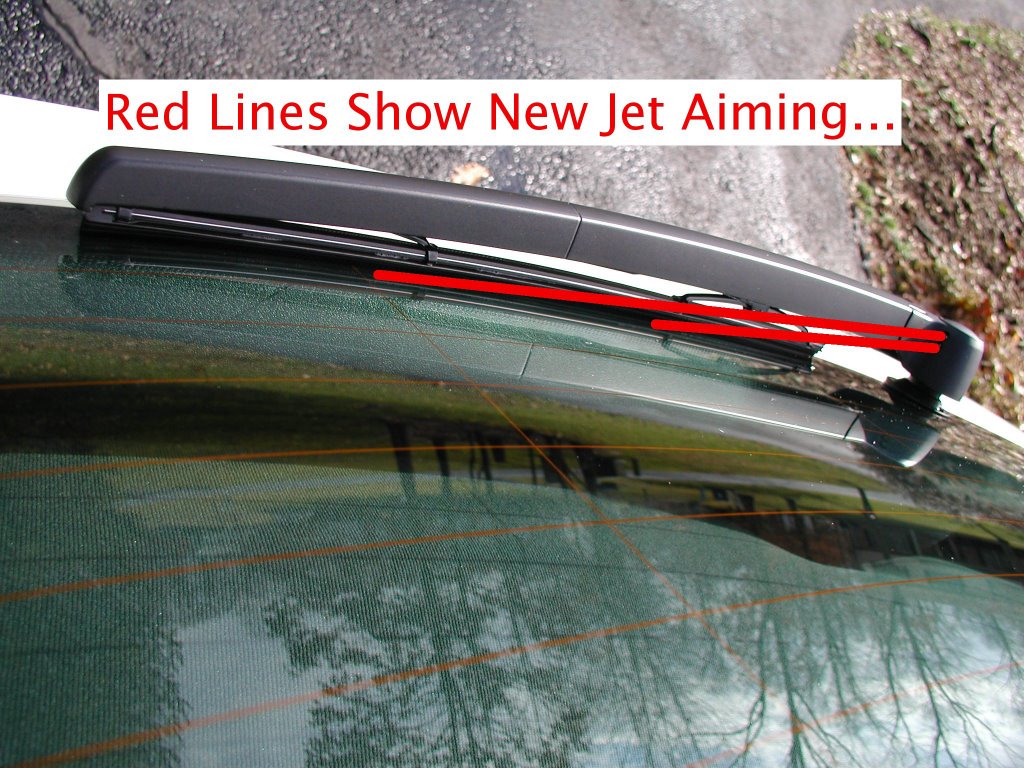
When you pull the washer on the rear wiper, it squirts water along the blade for a couple of seconds
before it first wipes, eliminating (or at least reducing) the dreaded first-wipe drag of grit across the dry glass. Better for the blade, fewer scratches on the glass. However.... after using the rear wiper/washer with actual road scuzz on the rear window, I saw how it could be made a little better.
The rear washer has two jets that rotate as part of the wiper hub, and aim at the leading edge of the blade. The lower jet is aimed about 1/3 of the way up from the tail of the blade, and the higher jet was aimed about 1/2 of the way up the blade. In real-world use, this meant that a streak formed on the glass under the upper 1/2 of the blade beacause not enough washer fluid reached it to clean the glass effectively. A stiff, thick pin (slightly larger than a straight pin used for sewing) can be used to adjust the ball jet, c-a-r-e-f-u-l-l-y. I hate adjusting those things - it's a real pain to get it right. But now, with a lot of patience, and a lot of trial-and-error, I now have the upper jet blasting the leading edge of the blade about 2/3 of the way up, and it gives a nice streak-free wipe. It also works even better at blasting grit off the blade before the first wipe.


If you have the front wipers 'on', and you put the car in reverse, the rear wiper will activate even if its switch is 'off'. I've also activated 'teardrop wiping' in the
Comfort System coding. This means that when you use the rear wiper/washer, and you switch it 'off', after a few seconds it'll activate itself for one last wipe to get the 'teardrops' that run down the glass.
Labels: HowTo
Rear Fog Lights
Making the rear fog lights functional on the A3 is a matter of getting the right switch, and making the right settings in the Central Electronics computer (using VAG-COM). There's no excuse for Audi not doing this from the factory.
From the
Wikipedia article:
Rear foglamps
(ECE Regulation 38, SAE J1319) In Europe, vehicles must be equipped with one or two bright red "rear fog lamps" (or "fog taillamps"), which are switched on manually by the driver in conditions of poor visibility to enhance vehicle conspicuity from the rear. The allowable range of intensity for a rear fog lamp is 150 to 300 candelas, which is within the range of a U.S. brake lamp. For this reason, many European vehicles imported to the United States have their rear fog lamps wired as brake lamps, since their European-specification brake lamps may not be sufficiently intense to comply with U.S. regulations, and rear fog lamps are not required equipment in the U.S.
Most jurisdictions permit rear fog lamps to be installed either singly or in pairs. Proponents of twin rear fog lamps say two lamps provide vehicle distance information not available from a single lamp. Proponents of the single rear fog lamp say dual rear fog lamps closely mimic the appearance of illuminated brake lamps (which are mandatorily installed in pairs), reducing the conspicuity of the brake lamps' message when the rear fogs are activated. To provide some safeguard against rear fog lamps' masking of brake lamps, ECE Regulations require a separation of at least 10 cm between adjacent illuminated edges of brake lamps and rear fog lamps.
That last sentence is why the US and non-US A3's have differently-configured taillamps. Fortunately, this is all done through coding, with no re-wiring necessary. In Europe on our cars, on each side the outermost tail light bulbs are tail & brake, the next bulbs (still in the lens on the car, not the hatch) are tail only, and the innermost bulbs (the ones in the red lenses on the hatch) are rear-fog only. The US-market configuration for the A3 is to have all three of those bulbs on at 24% of max brightness as taillights, and all three of them at 100% brightness as brake lights. Activating the rear fog function will use the innermost red lights on each side (the ones on the hatch).
Note: Also see my article on European taillights with amber turn signals.Finding the right switch to get is an adventure. Since this feature uses existing bulbs in the taillamp assemblies and a software setting, the only
physical difference between cars 'with' the feature and 'without' is the headlamp switch on the dash. Instead of making a few different switches for the most necessary combinations, Audi made
67 different switches (parts list PDF). Think of all the overhead expense to make smaller quantities (less economy of scale), documentation, shipping, stocking.... lots of unnecessary expense that could have been simplified. (
Update, November 2006: Switches with aluminium trim used in the new-generation Audi TT will work in the A3. I don't have a complete parts listing available for those.)
So, out of those 67 different switches, you have to pick the one you need. Some cars have the 'AUTO', and 'Coming/Leaving Home' features, mine does not. (Those
cannot be added by getting the 'wrong' switch, so don't try. It can't be done.) What I
do have is a DRL switch on my headlamp switch assembly, which turns on/off the dedicated Daytime Running Lamps in the bi-xenon headlamps. Again, this is dependent on those headlamps being factory-installed on my car, and cannot be used on cars not so equipped.
The part number for the switch that I needed was:
8P1 941 531 AH 5PR Audi describes this as "multiple switch for side lights, headlights, front and rear fog lights, for models with day driving headlights". In other words:
- WITH: Parking lights, headlights; front & rear foglights; panel dimmer; DRL switch; black; left-hand drive
- WITHOUT: 'AUTO'; coming/leaving home
I ordered it from Martyn at
VAGParts, the international shipping was no problem for them at all. You will need to pick the appropriate switch for how your car is equipped.
Installation of the switch is trivial: Simultaneously push-in-and-twist the knob
clockwise, which releases the clips, and while maintaining that pressure wiggle the switch and pull to get it out of the dash. Swap the corresponding wiring plugs between the two, and put the new switch in the same way.
The next step is to change the Central Electronics coding so that they are usable. A few people have reported that their cars were already coded this way (i.e. just plugging in the new switch was all they had to do), but that is not the norm. Decide whether you want one (driver's side) or two (both sides) rear fogs activated, and make the coding change using the steps described in my
VAG-COM Coding Reference.
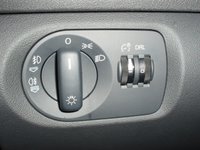
New switch installed. Note the extra icon on the left of the main switch indicating 'pull two clicks out for rear fog'.
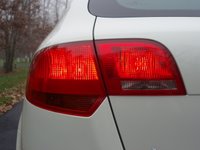
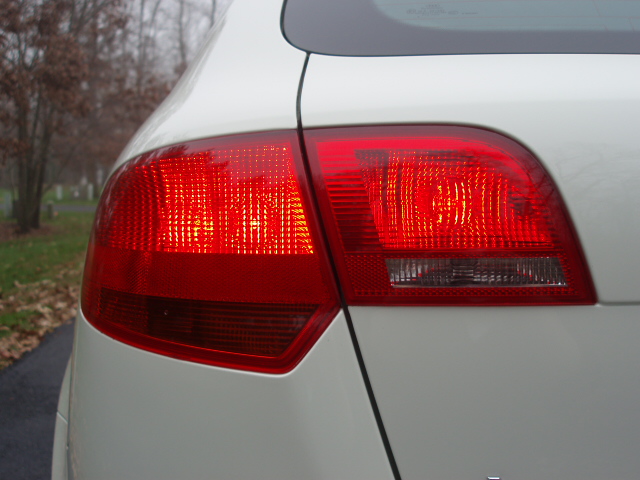
Taillights on, rear fogs off. The US configuration uses all three bulbs for taillights, and all three brighten for brakelights.

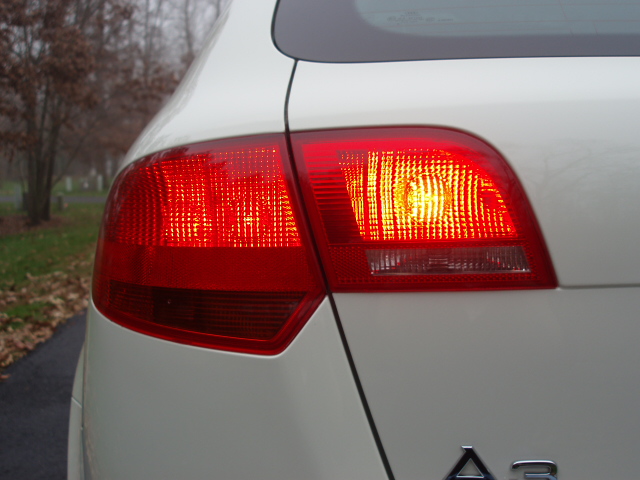
Taillights on, rear fogs on. You can see that the innermost bulb (the one on the hatch) is as bright as brake lights would be, to make you more visible from the rear in heavy fog or rain. DO NOT drive around like this in normal weather! It's dangerous and obnoxious.
Labels: HowTo, Upgrades
Hexomat Cargo Liner
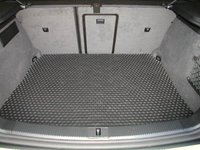
Got my Hexomat cargo liner today!
Here's the cargo mat situation for the A3 Sportbacks in the US: In Europe, there is apparently a structural difference in the rear cargo area floorpan between the front-wheel-drive and Quattro versions of the A3 Sportback. In the US, all of our A3's (Quattro or FWD) have the same cargo area shape and floorpan as the Quattro models do in Europe. So, when Audi originally brought in cargo area liners, they were the wrong ones and didn't fit properly.
(This seems to have been corrected now - the original (wrong) part number ended with '180', the new (correct) part number should end with '181'.)
While this was being straightened out, I looked around for other options. One concern with a liner that has a lip around the edge to trap spills is that the lip obstructs the cargo net attachment hooks. I've been happy with Weathertech products in the past, but they don't make a cargo liner for the A3 yet.
What I
did find was the
'Hexomat' products from AutoSportCatalog.com They have both floormats and cargo liners in black, grey and tan. I was afraid that they had made the same mistake that Audi did, but they were nice enough to send me paper templates of the mats to check sizing before I ordered. The templates were the correct shape, so I ordered a cargo liner. I did not order floormats because they are exactly the same shape as the original carpeted mats that came with the car. This may appeal to some people, but I think that the driver's mat is too short and needs to reach up beind the pedals to trap the maximum amount of dirt, and the passenger's mat really needs to cover the wheel well (the Audi 'Euro' rubber mats do exactly that, which is what I'm going to get for the floormats).
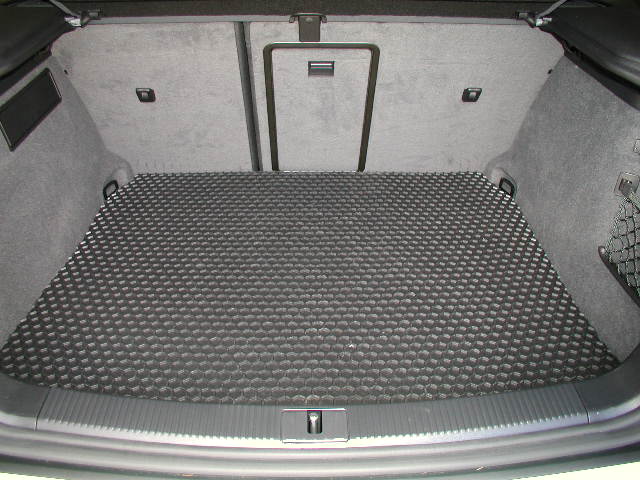
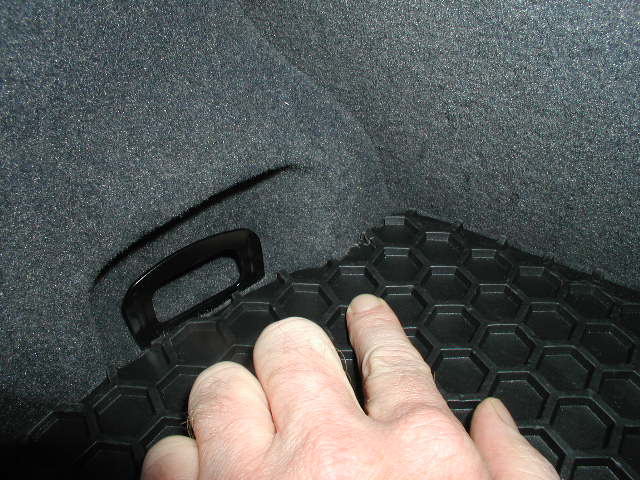
The Hexomat products have deep dimples over the whole surface of the mat instead of a lip around the edge. The advantage of this is that spills are more likely to be trapped near where they occur rather than spreading around the whole mat.
The Hexomat cargo liner arrived today. I'm happy with it. It needed to settle a bit to flatten out after being rolled up in the shipping box, but I helped it out by rolling it the opposite way for a bit. It also didn't fit exactly right in a couple of spots, but removing about a millimetre of rubber with a razor blade solved that, and I'm making the company aware of what they need to do. It's a very heavy grade material, and seems like it will be even more durable than my old Weathertech one was.
Black is definitely the right colour - I think the grey is a bit too 'milky' to match well with the rest of the cargo area.

Labels: Accessories
© 2005, 2025, Some rights reserved. You may use information here on your own site only if you attribute it and link back to the source. This is a personal site, NOT AFFILIATED WITH Audi, Volkswagen, their parent companies, or any other media interest.