Brake systems work on hydraulic pressure. The lines that carry the fluid from the master cylinder up front to each of the wheels are rigid metal for most of their length. However, they have to have some flexible part at each wheel to account for up-and-down suspension movement and steering. These flexible segments are typically made of reinforced rubber. With most stock rubber lines, some 'ballooning' of the line occurs when you press the pedal, which reduces the force transmitted to the brakes. If you had flexible lines that would resist 'ballooning', more of the pedal force will be transmitted to the brakes. This is usually accomplished by installing brake lines that have a braided stainless-steel jacket that prevents ballooning. The best quality (and DOT/TuV-approved) lines have a plastic or kevlar coating over the stainless-steel braid to protect the braid against chafing.
I have installed braided stainless-steel lines on several cars. On some cars they had a very noticeable effect, on others (including the A3) the stock lines are pretty strong to begin with, so the improvement is smaller, but still worth it.
The brake line kit I chose was the Goodridge part number 30007. It comes with 2 front lines, 2 rear lines, and new banjo-bolts and washers for the front lines.


Any time you loosen a brake line you introduce air into the system which will need to be bled out. Bleeding is usually a 2-person job - one person to pump & hold the pedal while the other one opens and closes the bleeder on the caliper. Since there is only one of me, I needed a way to bleed the brakes solo. I decided to replace the bleeder nipples with SpeedBleeders, which have an internal checkvalve. You can open one a couple of turns, then go pump the pedal to force air and fluid out of that line/caliper without worrying about sucking any air back in. When tightened down they seal just like the standard ones.
The thread size needed for the A3 (and VW Mk5 GTI/GLI/Jetta/Rabbit) is M10 x 1.0. While you can order them online direct from the manufacturer, they are also available cheaper at PepBoys auto parts under the 'HELP!' brand name, item number 12706. You'll need 2 packs, for a total of 4 bleeder nipples (1 per caliper).

And of course you'll need appropriate brake fluid.

Installing the new Goodridge stainless-steel brake lines was not too difficult, only tedious. I did one wheel at a time. After removing the wheel, the first thing I did was to replace the bleeder nipple with a SpeedBleeder. Then I removed the (two on the front / one on the rear) spring clip(s) securing the flex line, and unbolted one end at a time making sure to catch all brake fluid in an appropriate container. When installing the new lines, you have to be careful not to twist them. They have a dashed marking caled a 'torque line' that helps you visually see that you haven't twisted the line as you position it.
The front line uses a banjo-bolt to attach to the caliper. New bolts and copper washers (1 inner and 1 outer washer per banjo bolt) are provided - do not reuse the originals.
Once the new line was installed, I bled the air out of that caliper and pumped quite a bit of fluid through to completely flush that circuit before moving on to the next wheel.
New front brake line:


SpeedBleeder and banjo-bolt on the front caliper:

Front midpoint clip (shorter rear lines do not have this):

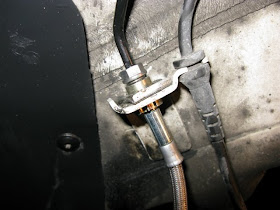
Front attachment of flex line to hard line:

Shorter rear lines:


The ends of the flex lines are made to fit into the brackets on the rear to secure the line and prevent it from twisting. The lines were not a compatible shape with the brackets on the car - I've contacted Goodridge to see if this was just an oversight on the kit that I got. I solved it by using a Dremel with a high-speed cutting wheel to cut notches in the rear brackets to accommodate the new lines.